Easy Alternator Upgrade
My 64 Comet was originally equipped with a generator. Generators are twice as big as alternators and put out about half as much power. When I first put the new motor in I stayed with the generator because it was already wired and it worked. About two days later the generator broke. There is no reason to repair a generator. It is well worth rewiring to upgrade to an alternator. A lot of people cringe at the thought of wiring. There is a very cheap and simple way to upgrade to an alternator, that any body can do.
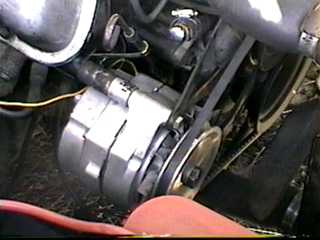
In most Fords the voltage regulator is mounted no where near the alternator. Usually on the opposite side of the engine bay. This requires many wires run between the two. There is an alternative. Use an internally regulated Chevy alternator. Since the voltage regulator is built in it will reduce the amount of wiring needed. The mounting flanges are almost identical to a Ford alternator so a Ford alternator bracket can be used. On a small block Ford if you have '64 or earlier heads you only need to put an additional one inch spacer behind the alternator(see picture below). With '65 and later heads you will have to drill the mounting flange from 3/8 to 7/16 to accommodate the larger bolt.
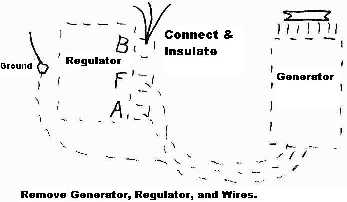
Before you can mount it you need to rip out the old generator and regulator. Obviously you want to disconnect the battery before starting. Also remove the wires between the generator and regulator. After removing the regulator connect any wires from the "B" post together and insulate. There are usually ground wires held down with one of the mounting screws, be sure to put the screw back to ensure a good ground.
Once you have the alternator mounted you need to wire it up. On the alternator there are three connections. Two quick disconnects and one stud. The quick disconnects are labeled "1" and "2". The stud is labeled "Bat". There is also a number of screws to attach a ground wire.
The wiring on cars with an ammeter is different than cars with a dummy light. I'll do my best to explain both. For cars with a dummy light take a small chunk of wire, connect a female quick disconnect to one end and a loop connector to the other. Plug the quick disconnect into the connection labeled "2" and the loop to the "Bat" post. The connector labeled "2" is what senses the battery voltage.
Connect a heavy gauge wire from the "Bat" post to the battery lead on the starter solenoid or straight to the battery (it works the same either way, its just easier to go to the solenoid). This wire feeds all the juice from the alternator to the car and battery.
The "1"
connector requires 12 volts from the ignition switch to turn the alternator on. The
best  place
to hook this to is the coil lead off the ignition switch. You don't want to hook it
straight to the coil because there is a ballast resistor between the switch and coil. On
most old Fords the coil lead on the ignition switch has a bullet connector. Make a
"Y" adapter that will allow you to plug both the coil and alternator into the
ignition switch. Plug the "Y" adapter between the coil lead and the ignition
switch. The dummy light goes between the switch and alternator. Hook one lead of the dummy
light to the ignition switch. Hook the other lead to a long piece of wire. Run the wire
out to the alternator. Just run it around the engine bay with the existing loom. If you
want it to look really nice buy some wire loom tape and tape it to the loom. Attach a
female quick disconnect to the end of the wire and plug it into the "1"
connection.
place
to hook this to is the coil lead off the ignition switch. You don't want to hook it
straight to the coil because there is a ballast resistor between the switch and coil. On
most old Fords the coil lead on the ignition switch has a bullet connector. Make a
"Y" adapter that will allow you to plug both the coil and alternator into the
ignition switch. Plug the "Y" adapter between the coil lead and the ignition
switch. The dummy light goes between the switch and alternator. Hook one lead of the dummy
light to the ignition switch. Hook the other lead to a long piece of wire. Run the wire
out to the alternator. Just run it around the engine bay with the existing loom. If you
want it to look really nice buy some wire loom tape and tape it to the loom. Attach a
female quick disconnect to the end of the wire and plug it into the "1"
connection.
You may get a good ground connection from the mounting bracket but don't count on it. Run a wire from the alternator case to a good ground point on the motor or body.
My car has an ammeter so I wired it a bit different. If I wired it the same as above the ammeter would not work properly. An ammeter measures current. For it to work properly you need all the current from the alternator to go to the battery through the ammeter. Instead of hooking the "Bat" post straight to the battery, hook it to the wires you took off the "B" post of the old regulator and insulate.
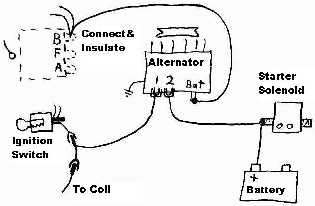 You could hook the "2" connector to
the "Bat" post but since the alternator is run through the ammeter before the
battery it is better to run the "2" connector straight to the battery or starter
solenoid.
You could hook the "2" connector to
the "Bat" post but since the alternator is run through the ammeter before the
battery it is better to run the "2" connector straight to the battery or starter
solenoid.
The "1" connector is hooked straight to the ignition switch without the dummy light.
The ground wire is hooked up the same as above.
That's all there is to it. Hook up the battery and your ready to go.
If you have any questions or comments e-mail me at mrriggs@gofastforless.com .